
I created a starter template for creating and deploying a Node.js Telegram bot to an Azure Function App using GitHub Actions.
The stack that's used by this starter:
- telegraf.js - Node.js Telegram bot
- Typescript - type safety
- Azure Function App - as a host for your bot
- Github Actions - building and deploying to Azure
This starter provides a mode for developing your bot on your local machine as well as a mode for running in production. The difference is that the production mode works using a Telegram webhook while the development mode uses the default Telegram long polling mechanism. This way there's no hassle using tunneling software like ngrok.
Setting up the bot
Step 1: Preparing the code
Let's start easy, fork/clone this repository. This repo provides all code to create a bot that only knows a Hello World command. Good enough to start with!
In the root of this repository you see a .env.example file. Rename this file to .env. This is where your secret Telegram bot token will be stored on your local machine. For now leave the value as is, we will replace it with the real value later on.
Step 2: Create an Azure Function App
First step is creating a Node.js Azure Function App. You can run through the default setup with all the settings you like. The only thing I advice is running it on Windows OS. This might seem unnecessary but I found Windows Azure Function Apps to run Timer triggers more consistent than on a Linux OS.
When asked for a plan type, select Consumption (Serverless). By default Apps running on a Consumption plan will timeout after a maximum 10 minutes of inactivity, but we will use a Timer trigger Function App to fix that. This Timer trigger is a second Function that is deployed, which is set up to trigger every 10 minutes. This will make sure the bot never gets a timeout without using a more expensive plan type, pretty awesome!
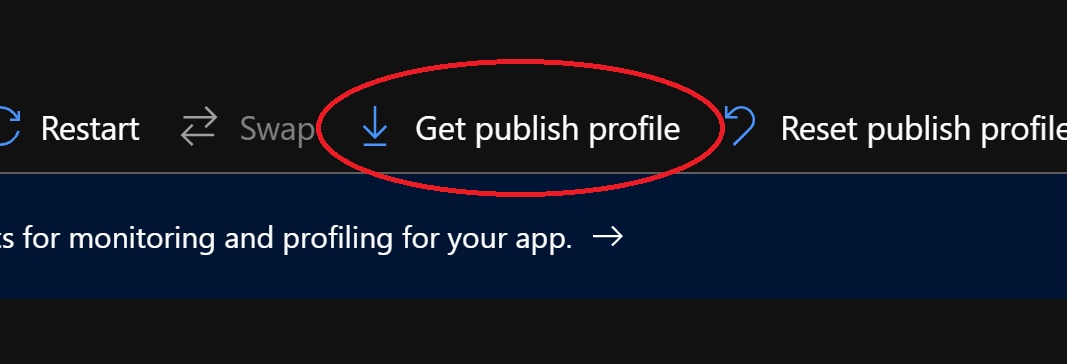
After creating your Node.js Azure Function App, go to the Function App resource and download the publish profile. We will need that later when configuring our automatic deployment.
Next thing we will have to configure is our AzureWebJobsStorage connection string. While creating your Azure Function App, you also had to configure a Storage account. Navigate to that storage account in the Azure portal. Next go to the Access keys menu item, click Show keys and copy either one of the Connection strings. Now paste that connection string in the AzureWebJobsStorage field in local.settings.json.
Step 3: Registering the bot
In order to register your Telegram bot you need to talk to the BotFather on Telegram.
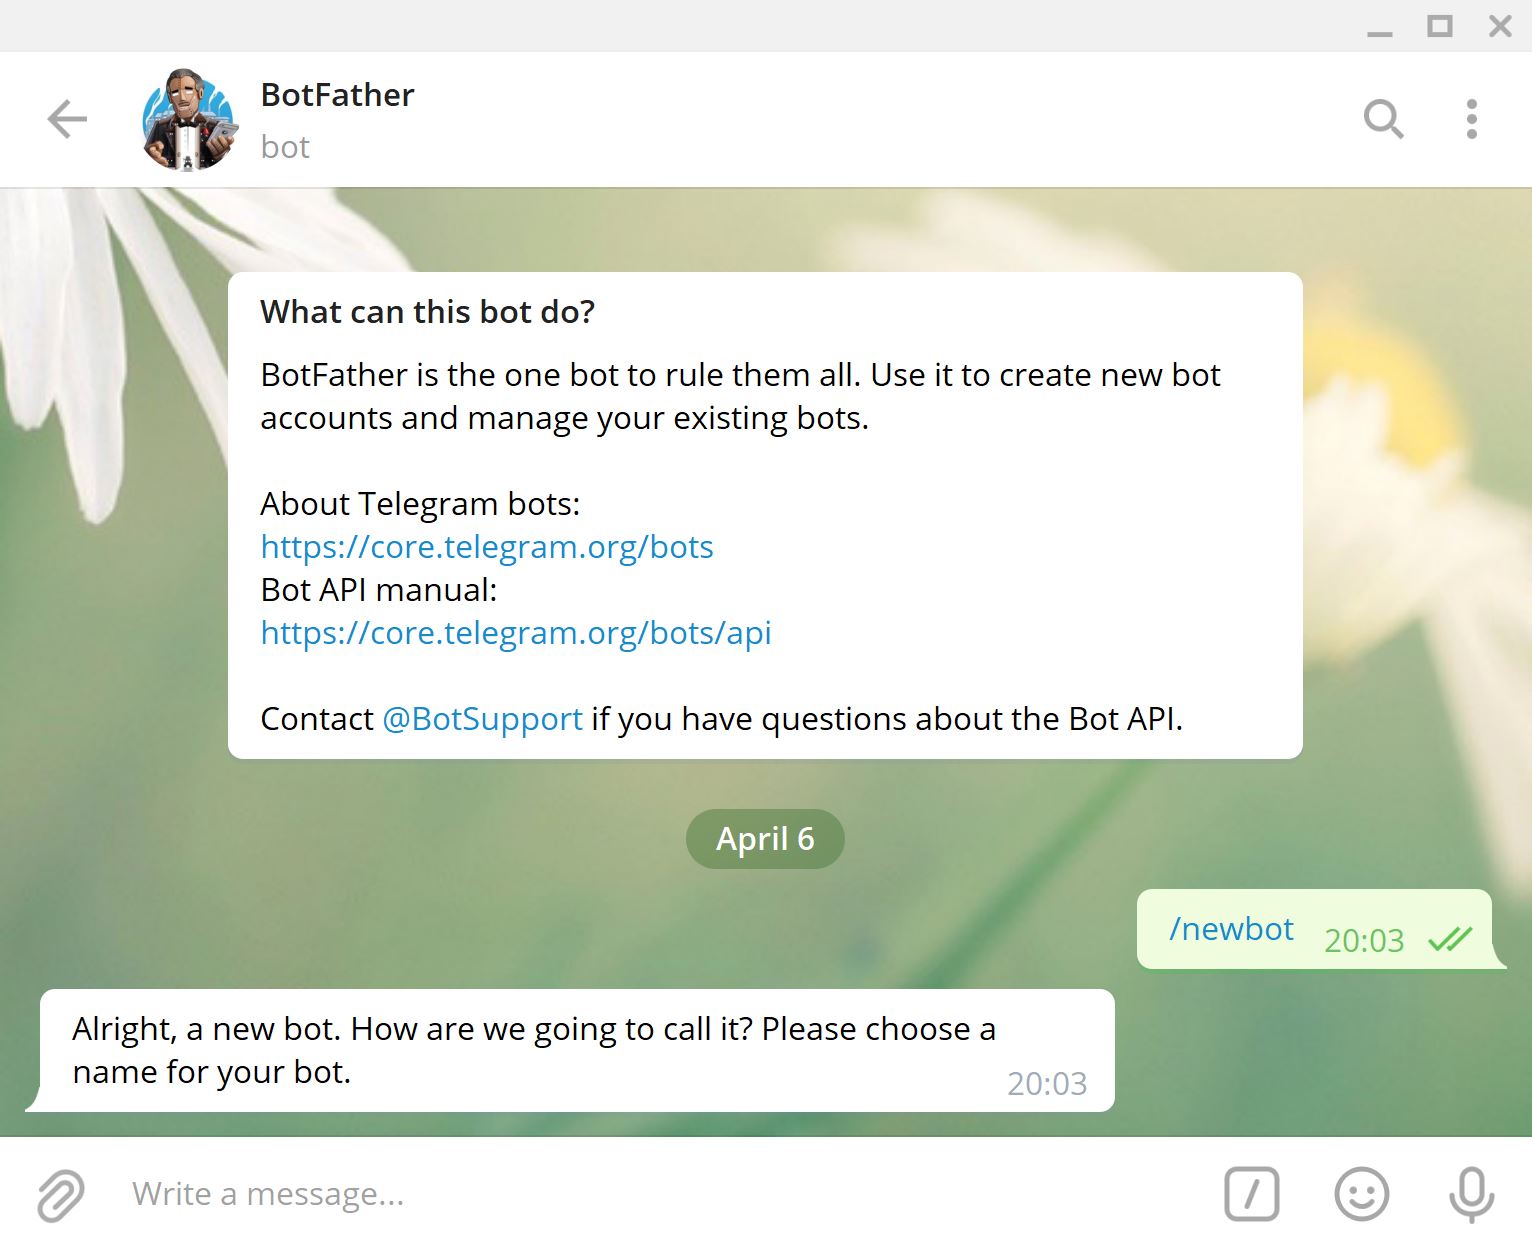
By typing /newbot your new bot will be registered. The name that you enter is displayed in contact details and elsewhere. The Username as a short name, to be used in mentions an t.me links. This name must end in 'bot', e.g. 'tetris_bot' or 'TetrisBot'.
When done registering the bot you'll get a token to access the HTTP API.
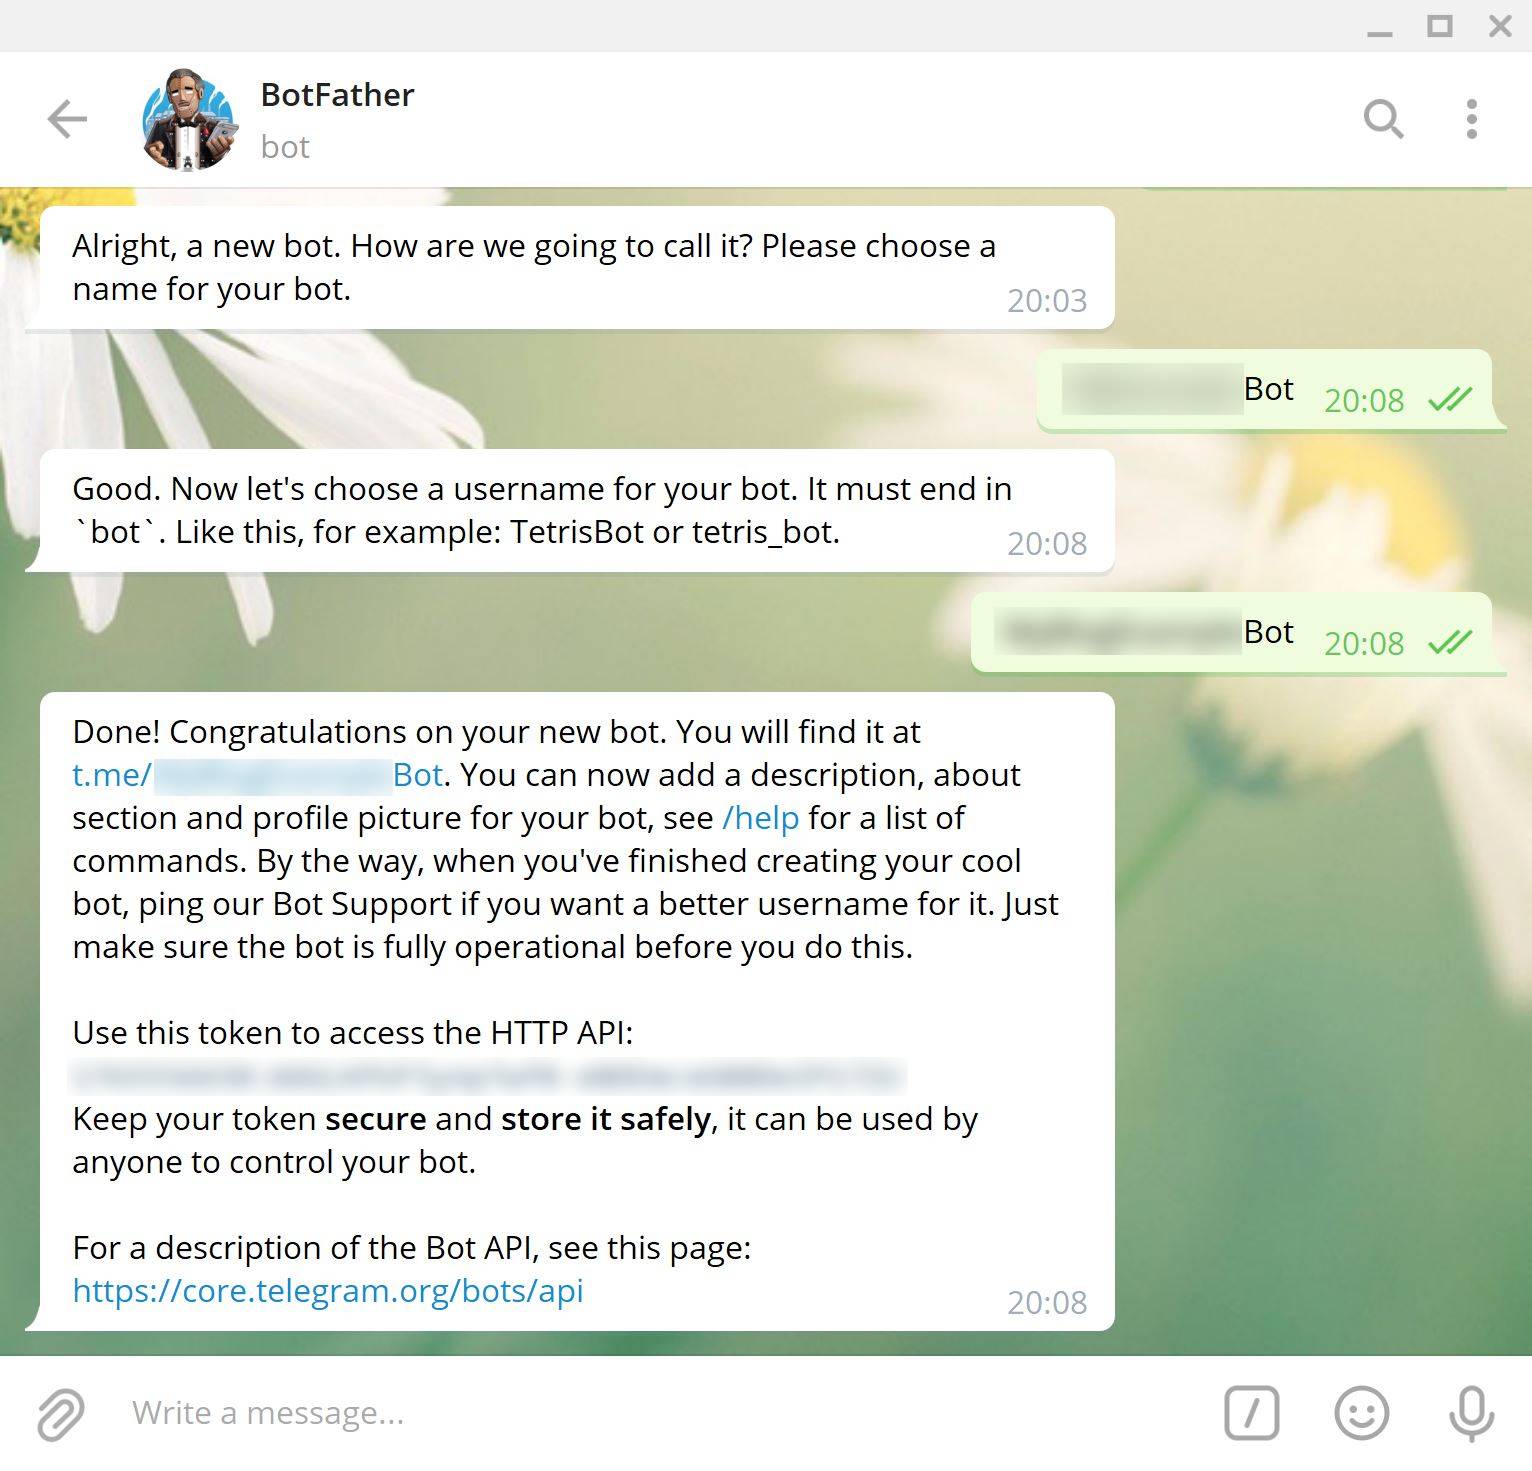
This access token is what should be placed as a value of the BOT_TOKEN key in your .env file in the root of this project. Next to that, the BOT_TOKEN should also be registered as an Application setting in your Function App configuration.
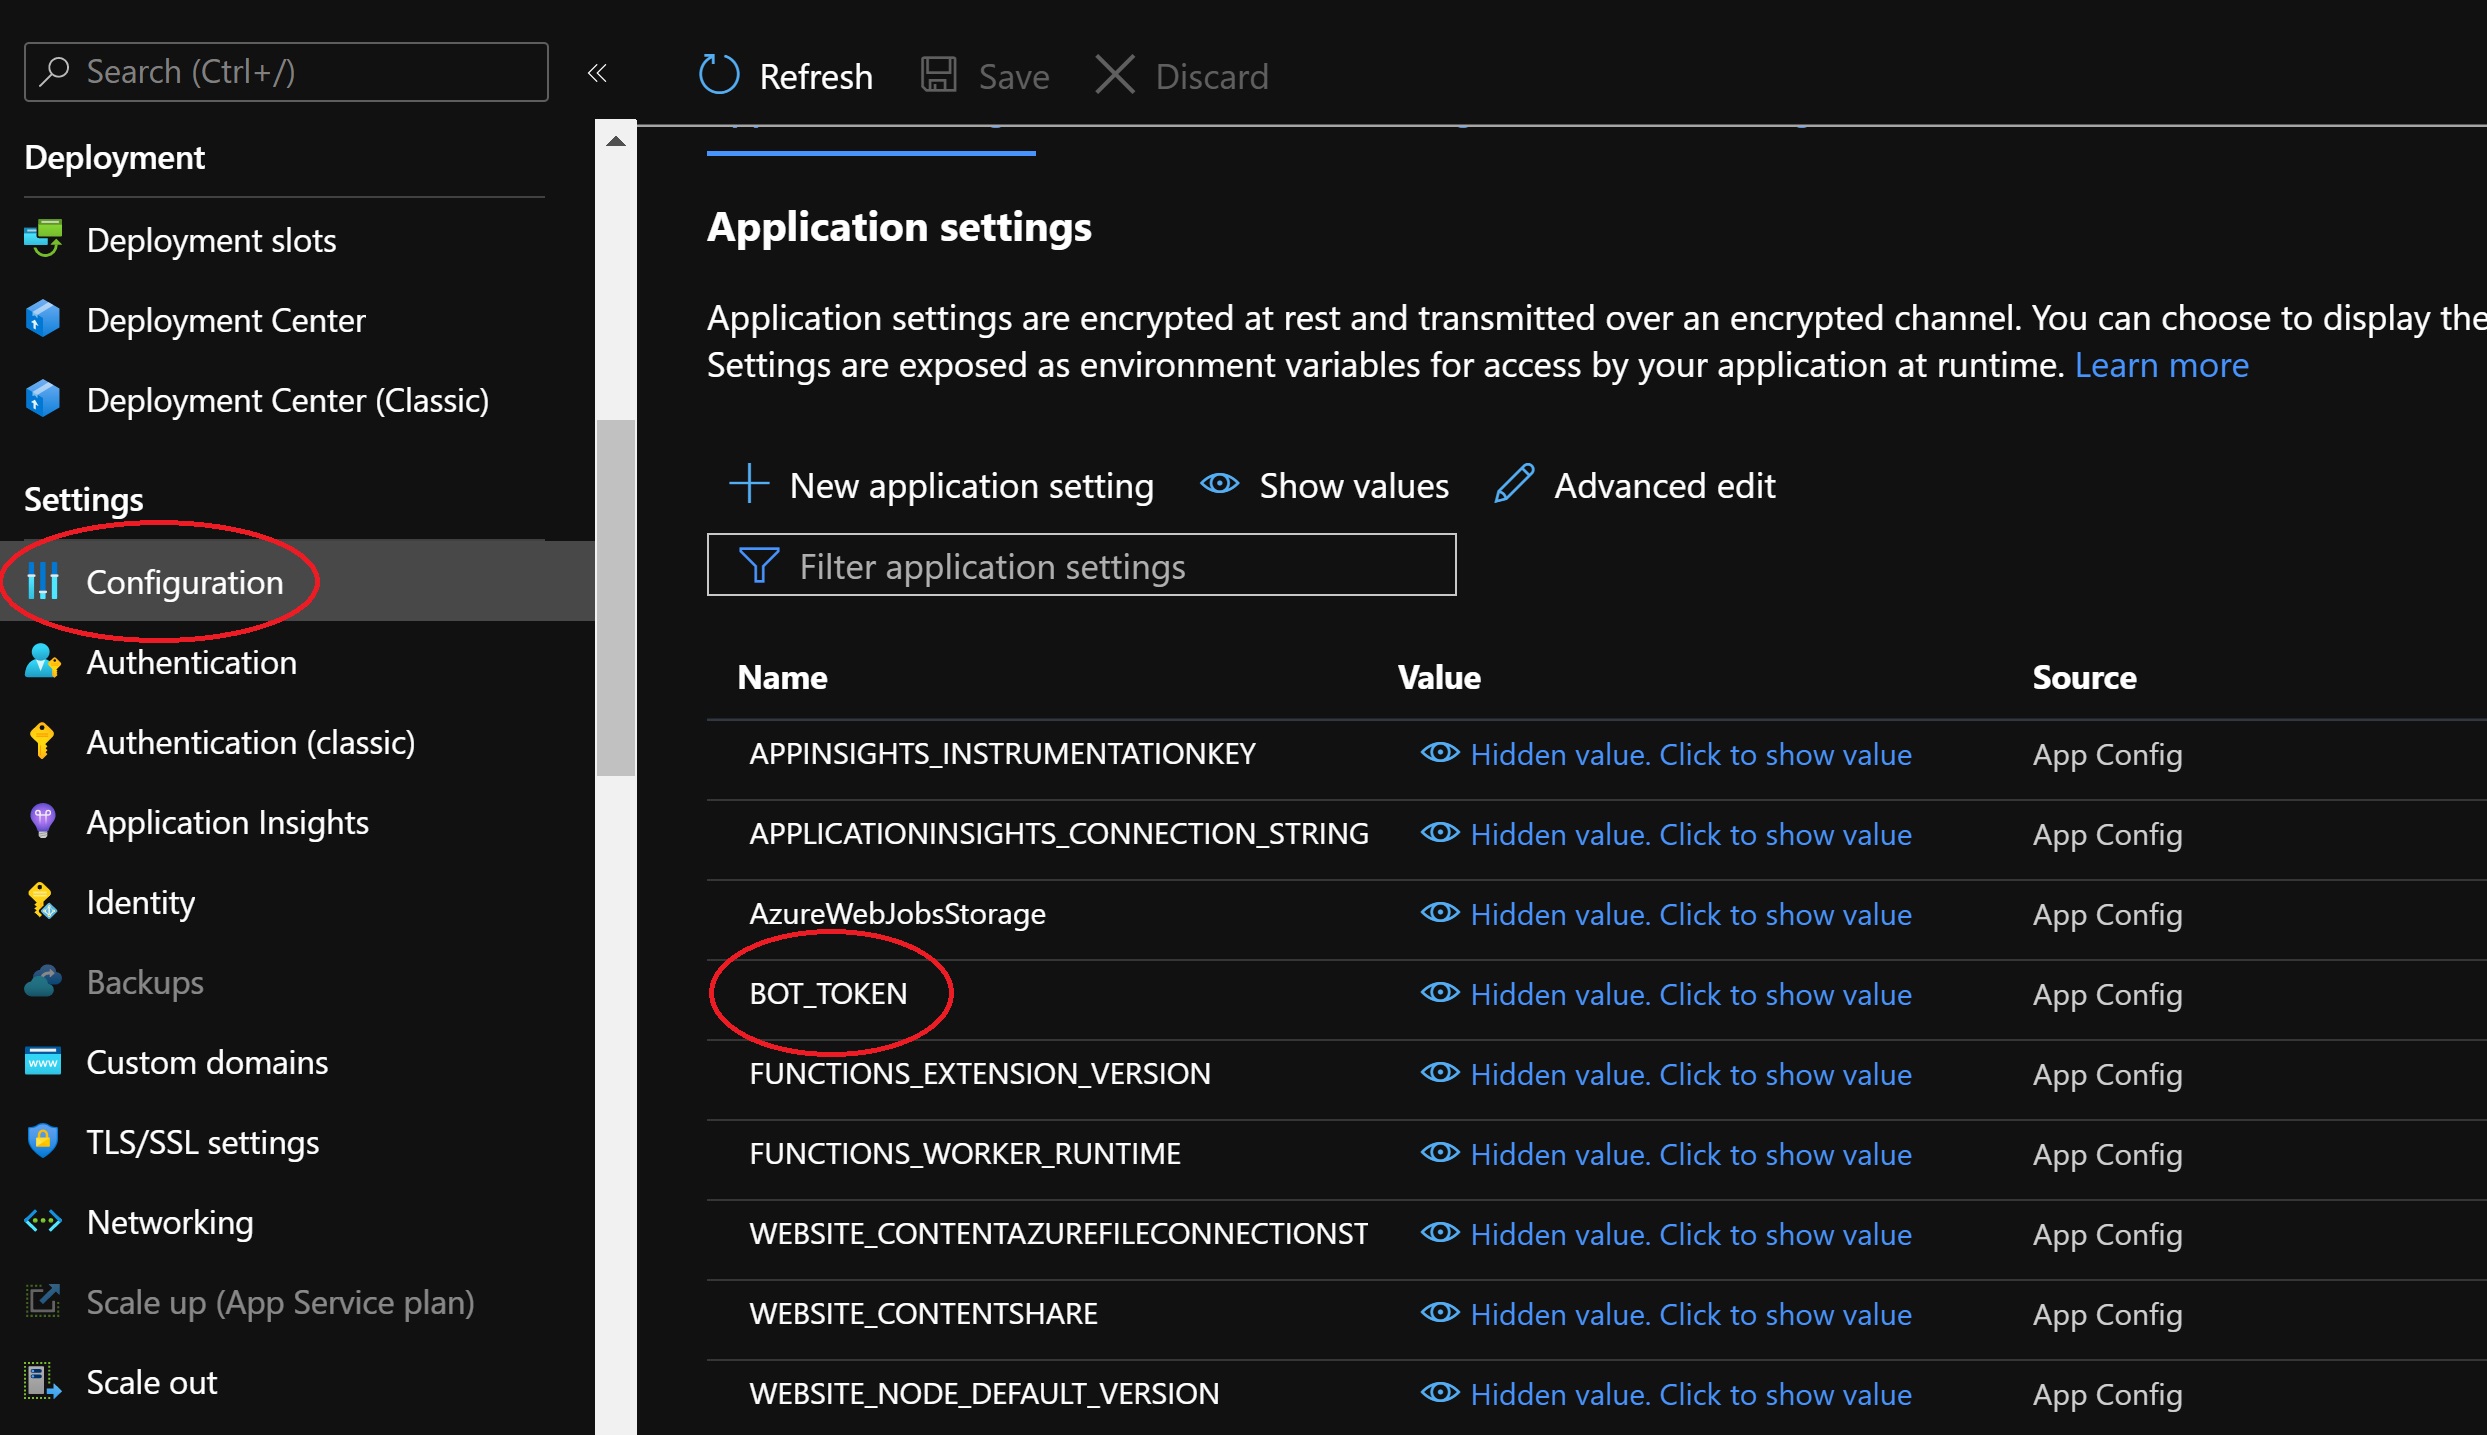
While in the Application Settings window we should also add a WEBHOOK_ADDRESS setting. The value should be the Function App URL like so: https://your-function-name.azurewebsites.net/api/bot.
Don't forget to press save after adding the settings!
The bot is now almost ready!
Step 4: Deployment
Within the project I used a GitHub Action to build and deploy the code to the Azure Function App. In order to run it properly we need to adjust 2 settings.
- In
.github/workflows/main.ymlwe need to set theAZURE_FUNCTIONAPP_NAMEvariable. This should be the name of your Azure Function App. - On GitHub go to your repository Settings page, and navigate to the Secrets tab:
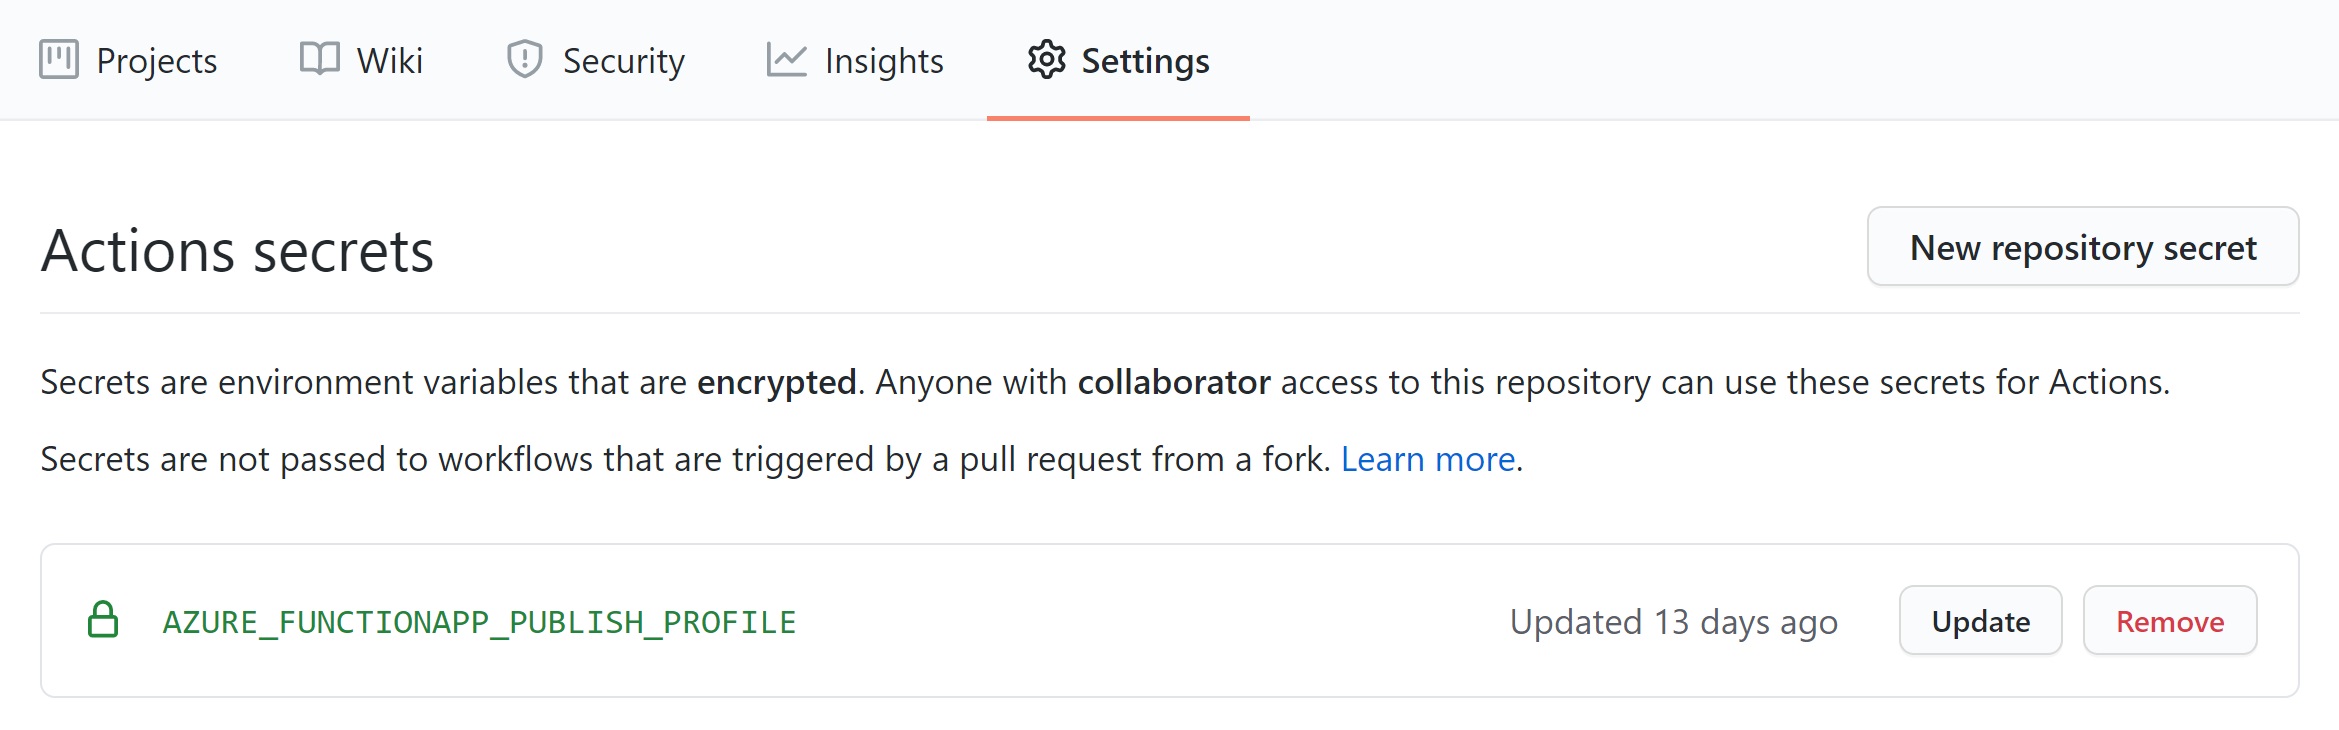 Create a secret with
 AZURE_FUNCTIONAPP_PUBLISH_PROFILEas the name, and the content of the publish-profile file we downloaded earlier. Just copy/paste the entire content into the Value field. This publish profile will make sure the GitHub Action deploys the code to the correct Azure Function App.
If everything is configured correctly a GitHub Action should now run after every commit to your repository. It automatically deploys your code to the Azure Function App, so all you have to do is push changes to your repository to update the bot!
All the setup should be done by now, let's test the bot!
Testing the bot
Exciting, the bot should be up and running by now! Let's find the bot on Telegram (BotFather sent your the t.me link to your bot in the same message as the access token) and try sending it a /hello command. If everything went well you should get a response as follows:
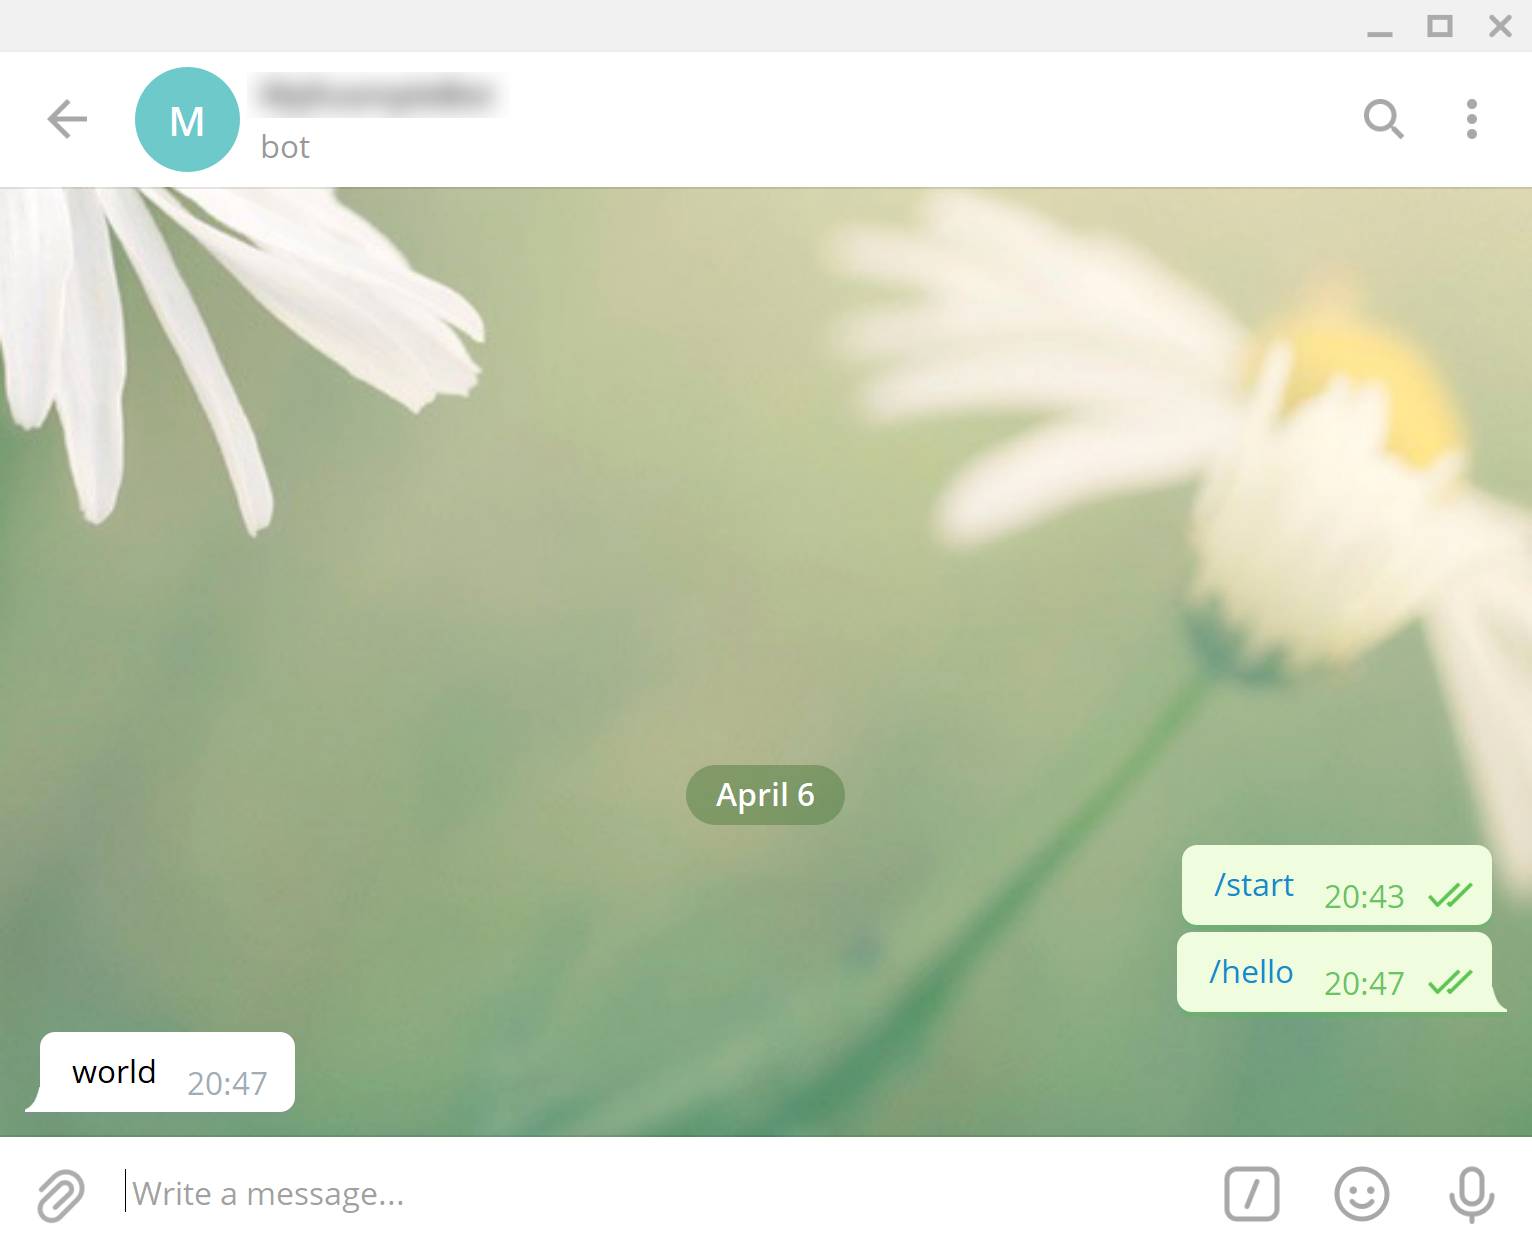
Hooray, you setup your own Telegram bot!
The only command I configured is /hello which you can find in /bot/commands/botCommands.ts. For all the bot commands documentation, see telegraf.js.
Local development
A part that's forgotten about most of the time, but the bot must be developed on a local machine. I read a lot of blog posts which want you to tunnel your local environment to a public URL so you can use it as a webhook. Nonsense if you ask me. I modified the code so that the default Telegram long polling mechanism is used on your machine. Simply run npm run watch to transpile the TS files to JS files and run npm start to start the Function.
When the Function starts, you see that the bot is available at http://localhost:7071/api/bot. Simply open that page in your browser and keep it open. Now you can change the TS files and immediately test the result on Telegram.
My final tip is to create a separate bot for production and for development. This way you can develop and test a bot and keep your production bot running safely. Simply request a new token using /newbot at the BotFather and store that token in your .env file. The .env file won't be deployed to the Azure Function App so will only be used for local development.
It's a wrap
That's it! Please let me know what you're going to use the bot for. If you ran out of ideas, check out What can I do with bots? to see what Telegram supports.
Happy coding!
View on GitHub